Home Page
The SmartTraveler Plus home page (see Figure 1) provides buttons to access the application’s major functions, which, depending upon local configuration, may include:
- Real-Time Map & Schedule: View current vehicle locations on a map view and retrieve up-to-the-minute arrival time for a selected stop.
- Route Schedules: View stop-level timetables for a selected route & direction.
- Trip Planner: Access the transit agency’s trip planner application to determine a transit itinerary based on selected trip origin, destination, and time of day.
- Notify Me: Subscribe for personalized vehicle arrival notifications and alerts via e-mail or Short Message Service (SMS).
Mouse over (that is, position the cursor over) any button to view a brief description of the function accessed by clicking that button.
The home page also includes a Transit Messages display, where the transit agency may alert site visitors to current conditions, such as detours and service delays.
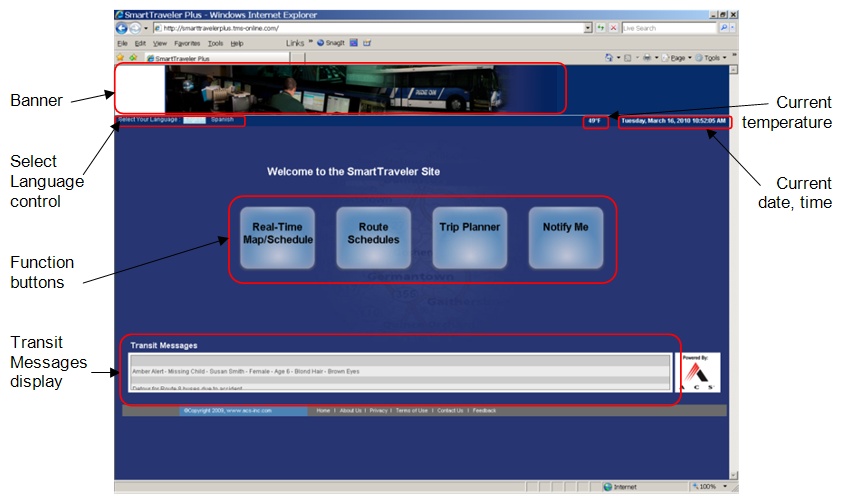
Figure 1. SmartTraveler Plus Home Page Layout.
Below Table summarizes and describes the major elements of the home page.
| Screen Object | Description |
|---|---|
| Banner | Transit property’s banner, which may be image inherited from parent pages of the transit property’s Web site. |
| Select Language control | For multi-lingual implementations, allows user to select a text language. |
| Current temperature | Displays the current temperature in the transit property’s locale. |
| Current date, time | Displays the current date & time in the transit property’s locale. |
| Function buttons | Click buttons to access the major SmartTraveler Plus functions. Mouse over buttons to view a brief description of each function. See bullets under section Home Page, above, for a description of available functions. |
| Transit Messages display | Display is used to alert site visitors to current conditions, such as detours and service delays, and other important announcements. |
Real-Time Map & Schedule
This function displays real-time transit service graphically on a map view of streets, transit routes, stops, and vehicles. The page offers clickable features so a user may select a stop to get current vehicle arrival time projections at that location or select a vehicle icon to get current service (route & direction) information and schedule status of that vehicle. Figure 2 illustrates the layout of the Real-Time Map & Schedule page.
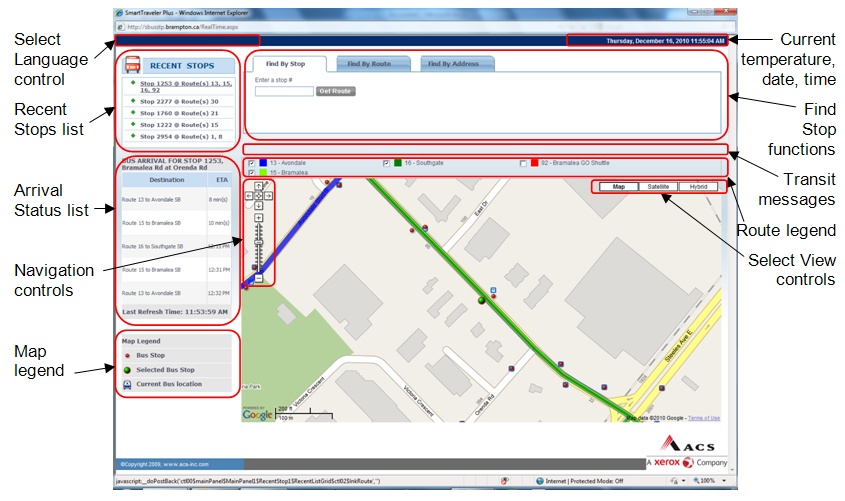
Figure 2. Real-Time Map & Schedule Page Layout.
Below Table summarizes and describes the major elements of the Real-Time Map & Schedule page.
| Screen Object | Description |
|---|---|
| Select Language control | For multi-lingual implementations, allows user to select a text language. |
| Recent Stops list | Lists up to five recently selected stops, showing stops’ numeric IDs and service routes. User may click on any of the list stops to select that stop and display current vehicle arrival time projections there. |
| Arrival Status list |
List of current vehicle arrival time status information for the selected stop:
|
| Navigation controls | Standard Google Maps controls to pan in any direction in the map view or set the zoom level. |
| Map legend |
Identifies transit icons used in the map view, including:
|
| Current temperature | Displays the current temperature in the transit property’s locale. |
| Current date, time | Displays the current date & time in the transit property’s locale. |
| Find Stop functions |
Tabs to access Stop Selection Functions (for procedures, see below):
|
| Transit Messages display | Scrolling message display used to alert site visitors to current conditions, such as detours and service delays, and other important announcements. |
| Route legend | Identifies by color the transit routes displayed on the map view. User may hide/unhide routes selectively by clicking on their corresponding checkboxes. |
| Select View controls |
Control to toggle between different map views:
|
The following sections describe navigation and functional features of this page.
Map Navigation
The user navigates the Real-Time Map & Schedule page’s map by using common Google Maps features, including the following:
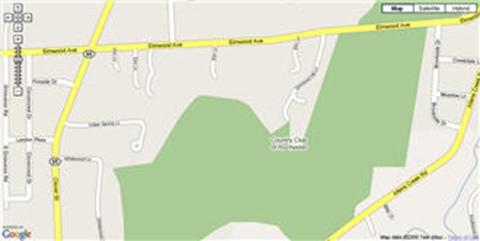
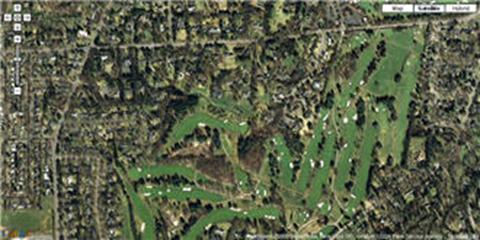
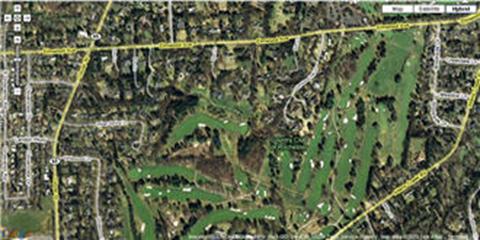
- Select View controls: At the top right corner of the map view, click on “Map”, “Satellite”, “Hybrid”, or “Terrain” controls to switch the view between a schematic map and aerial imagery (see Figure 3 for examples).
- Navigation controls: At the top left corner of the map view, click on standard Google Maps controls to pan in any direction or zoom in or out. For more information on using these controls, refer to online Google Maps help at http://maps.google.com/support/?hl=en. The zoom level range is limited so that the map view remains focused on the transit property’s service area.
- Hand tool: Point the cursor over the map and it changes to a hand icon. Drag – that is, hold down the left mouse button and move the mouse – to pan the map’s view in any direction.
| a) “Map” view: |
|
| a) “Satellite” view: |
|
| a) “Hybrid” view: |
|
Figure 3. Map View Options.
Route Legend
The route legend is shown directly above the map view. This legend identifies all transit routes selected for display on the map. Routes are identified by number & name and are associated with a color that matches the route trace shown on the map. Click the checkbox next to a route to hide/unhide that route’s trace from the map.
Transit Markers
The SmartTraveler Plus map display includes the following types of markers to show information on transit assets:
- Stops: These are shown as red dots on the map.
The currently selected stop is shown as a larger green dot. The following user functions
are available for these markers:
- To view a stop’s identification number, mouse over the marker.
- To view a stop’s address or select a stop for displaying its arrival status data, click on the marker. An info window appears showing the stop’s identification number and address. Click on the “Select this stop” hyperlink to make this the currently selected stop.
- To dismiss the info window, click [x] at the info window’s top right corner
- Current Bus Locations: These are shown as bus icons
on the map. Their positions are updated periodically to reflect current vehicle
location. The marker incorporates an arrowhead that indicates the vehicles current
travel direction. The following user functions are available for these markers:
- To view a vehicle’s identification and status information, mouse over the marker. An info window appears showing the vehicle’s identification number, current service direction, current route number & name, and its schedule status (“on time” or number of minutes early or late).
- To dismiss the info window, click x at the info window’s top right corner.
Stop Selection Functions
To access transit arrival status information for a stop, that stop must first be selected on the Real-Time Map & Schedule page. This section describes the available procedures for selecting a stop.
To select a stop via the map view- On the Real-Time Map & Schedule page’s map view, navigate to, then click, the stop marker of interest. The stop’s info window pops up.
- Click on the “Select this stop” hyperlink in the info window to select this stop. The stop’s marker changes to a larger green dot to indicate that it is the currently selected stop. The Arrival Status list, Recent Stops list, and route legend update to reflect the currently selected stop.
- On the Real-Time Map & Schedule page, click the “Find by Stop” tab above the map
view. The “Enter a stop #” data entry field appears (see Figure 4).
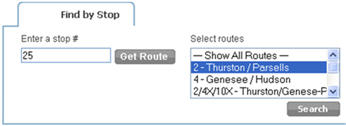
Figure 4
- In the “Enter a stop #” data entry field, enter the numeric identifier for the stop of interest, then click the Get Route button.
- If the entered number does not identify a recognized stop, the message “No stop found for given stop code.” appears. Review and correct the entered value or, if the identifier is not known, try one of the other stop selection procedures described in this section.
- If the entered number does identify a recognized stop, the “Select routes” selection list appears.
- In the “Select routes” selection list, click on a single route of interest or click on the “Show All Routes” entry to retrieve status information for all routes serving this stop. Click the Search button. The map view updates to center on the selected stop with the green dot marker. The Arrival Status list, Recent Stops list, and route legend update to reflect the currently selected stop.
To select a stop by transit route
- On the Real-Time Map & Schedule page, click the “Find by Route” tab above the map
view. The “Routes” pull-down selection list appears, listing all service routes,
each in combination with one or two service directions, in the transit system (see
Figure 5).

Figure 5
- In the “Routes” selection list, click a route & direction of interest. The “Stops” pull-down selection list appears to the right of the “Routes” list, listing all stops that are served by the selected transit route & direction.
- In the “Stops” selection list, click a stop of interest. The map view updates to center on the selected stop with the green dot marker. The Arrival Status list, Recent Stops list, and route legend update to reflect the currently selected stop.
To select a stop by street address
- On the Real-Time Map & Schedule page, click the “Find by Address” tab above the
map view. The “Enter an address” data entry field appears (see Figure 6).

Figure 6
- In the “Enter an address” data entry field, enter the street address of interest. Directly after the street address, the municipality name, state/province name or abbreviation, and/or postal code may be entered to qualify the address further. When finished entering the street address, click the Find button.
- If the entered address matches multiple locations, the message “Many addresses found, please select from list or search again.” appears. A list of the matching addresses also appears to the right of the “Enter an address” field. Click one of the addresses shown in this list. The “Select routes” selection list appears.
- In the “Select routes” selection list, click on a single route of interest or click on the “Show All Routes” entry to retrieve status information for all routes serving this stop. Click the Search button. The map view updates to center on the selected stop with the green dot marker. The Arrival Status list, Recent Stops list, and route legend update to reflect the currently selected stop.
To return to a recently selected stop
SmartTraveler Plus remembers the five stops most recently selected by the user on this computer. (Note that this requires cookies to be enabled on the user’s computer.) These stops are identified in the Real-Time Map & Schedule page’s “Recent Stops” list (see Figure 7). Stops are listed by their numeric identifier and the route(s) for which transit arrival status information was requested.
- In the “Recent Stops” list shown at the top left corner of the Real-Time Map & Schedule
page, click one of the listed stops. The map view updates to center on the selected
stop with the green dot marker. The Arrival Status list, Recent Stops list,
and route legend update to reflect the currently selected stop.
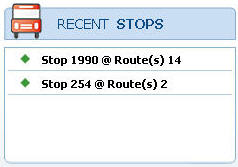
Figure 7
Route Schedules
The Route Schedules page allows site visitors to view stop-level timetables of the planned transit schedule for a selected route & direction at a selected stop for a selected date. Figure 8 illustrates the Route Schedules page for an example selected timetable.
The timetable is presented in tabular format. Table columns represent individual vehicle trips serving the selected route & direction ordered chronologically from left to right. Table rows represent stops sorted from top to bottom in the order that they are visited along the selected route & direction by vehicle trips . Table cells display the schedule vehicle arrival/departure/passing time for the vehicle trip at the transit stop identified at left.
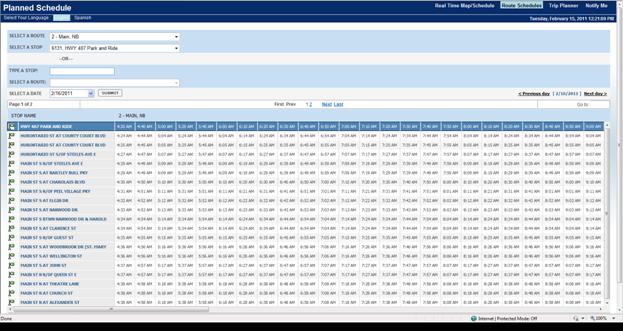
Figure 8
Timetable Selection Functions
The user may select a timetable of interest by either of two methods: (1) by first selecting the service route & direction of interest and then the stop of interest, or (2) by first selecting the stop of interest and then selection the service route & direction of interest. Procedures for both selection methods follow.
To select a timetable by route & direction then stop- From the SmartTraveler Plus home page, click the Route Schedules button. The Route Schedules page is displayed with empty data entry fields shown at the top, including a “Select a Route” pull-down selection list that lists all service routes, each in combination with one or two service directions, in the transit system, and a “Type a Stop” entry field.
- In the “Select a Route” pull-down list, click a route & direction of interest. The “Select a Stop” pull-down selection list becomes active, listing all stops that are served by the selected transit route & direction.
- In the “Select a Stop” selection list, click a stop of interest. The main body of the page is updated to display the timetable for today’s date for the selected service route & direction, and highlighting the selected stop.
- From the SmartTraveler Plus home page, click the Route Schedules button. The Route Schedules page is displayed with empty data entry fields shown at the top, including a “Select a Route” pull-down selection list that lists all service routes, each in combination with one or two service directions, in the transit system, and a “Type a Stop” entry field.
- In the “Type a Stop” data entry field, enter the numeric identifier for the stop of interest, then press the Enter key.
- If the entered number does not identify a recognized stop, the message “No stop found for given stop code.” appears. Review and correct the entered value or, if the identifier is not known, try another timetable selection procedures described in this section.
- If the entered number does identify a recognized stop, the “Select a Route” selection list becomes active.
- In the “Select a Route” selection list, click a route & direction of interest. The main body of the page is updated to display the timetable for today’s date for the selected service route & direction, and highlighting the selected stop.
Timetable Navigation
Once a timetable is selected and displayed on the Route Schedules page, the user navigates the timetable using the following tools:
- “Select a Date” entry field: To change the date of the displayed timetable, click on the “Select a Date” entry field at the top right of the timetable display, enter a date in numerical month/day/year format, and click the Submit button. Alternatively, click on the (down arrow) icon to the right of the entry field to reveal a calendar date selection tool and navigate to the month and date of interest. The screen display changes to the timetable for the newly selected date.
- “First”, “Prev”, page number (“1”, “2”, etc.), “Next”, “Last” hyperlinks: For timetables that extend over multiple pages, to change the displayed page to the first page, the previous page, the selected page number (Page 1, Page 2, etc.), the next page, or the last page, click the corresponding hyperlink.
- “Go to:” entry field: For timetables that extend over multiple pages, to change the displayed page to a page number of interest, enter the page number and press the Enter key.
- “<" Previous day”, “Next day ">” hyperlinks: To change the date of the displayed timetable one day at a time, click the “< Previous day” or “Next day >” hyperlink at the top right of the timetable display. The screen display changes to the timetable one day earlier or later. >
- Horizontal scrollbar: If there are more trips serving this route & direction than fit on the screen, manipulate the scrollbar below the timetable to pan to display earlier or later trips.
- Vertical scrollbar: If there are more stops served along this route & direction than fit on the screen, manipulate the scrollbar to the right of the timetable to pan to display stops up or down the route.
Trip Planner
If the transit property maintains its own online transit itinerary planning Web page, or makes its service and schedule data available to the Google Transit page, the SmartTraveler Plus home page’s Trip Planner button may be configured to link to that page. Figure 9 shows an example Google Transit display.
From the SmartTraveler Plus home page, click the Trip Planner button to link to the transit property’s online transit planner or Google Transit.
For more information on using Google Transit, refer to its online help at http://maps.google.com/help/maps/transit/.
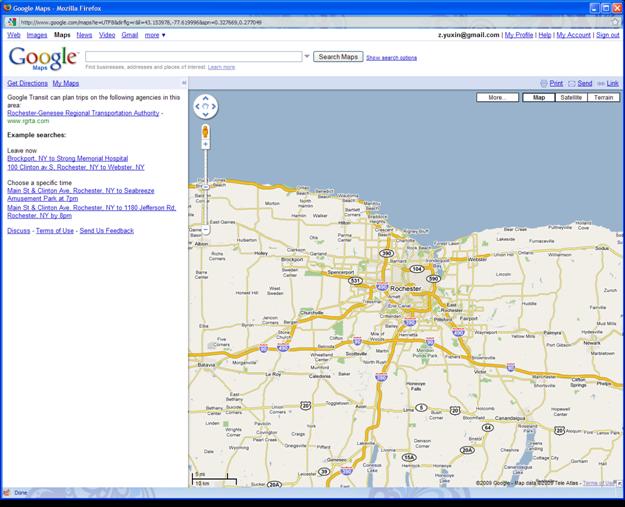
Figure 9
Notify Me
This function allows site visitors to subscribe for personalized vehicle arrival notifications and alerts via e-mail or SMS (that is, short message service) text messaging. Before using Notify Me, the user must register and set up their notification user profile. Once registered, the user may log in to the Notify Me page to configure the notification of interest by selecting stop number, service route & direction, day(s) of week, and time of service.
User RegistrationNotify Me users must first register with the system. After initial registration, users may modify their user profiles, for instance to change the method of notification from e-mail to SMS text or vice versa.
To register as a new “Notify Me” user- From the SmartTraveler Plus home page, click the Notify Me button. The Login page appears (see Figure 10).
- Click the “Click Here to Register!” button. The Registration page appears (see Figure 11).
- Fill in each of the required data entry fields shown on this page: First Name, Last Name, Email, Password, and Retype Password. Note that passwords are required to have at least six characters and are case sensitive.
- If mobile (SMS text messaging) notifications are desired, enter the mobile phone’s number in the Mobile data entry field, and select the cellular phone service provider’s name from the Cellular Provider pull-down selection list.
- Select the desired notification method from the options listed under “How would you like us to send the notification?”: None, Email, or SMS.
- Click Save to transmit the registration input data.
- If any of the required data entries are missing or invalid, the Registration page reappears with red text at top specifying which input data is missing or incorrect. Correct the data entries as required and click Save to retransmit the registration input data.
- If all of the registration input data is valid, the Login page appears with the message “Registered Successfully” near the top.
-
Once successfully registered, the user may proceed to log in to the Notify Me function
to select transit service notifications of interest. See the User Login and Logout
section.
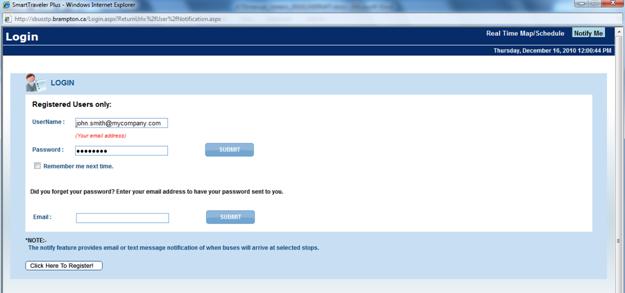
Figure 10
Notify Me Function, “Login” Page.
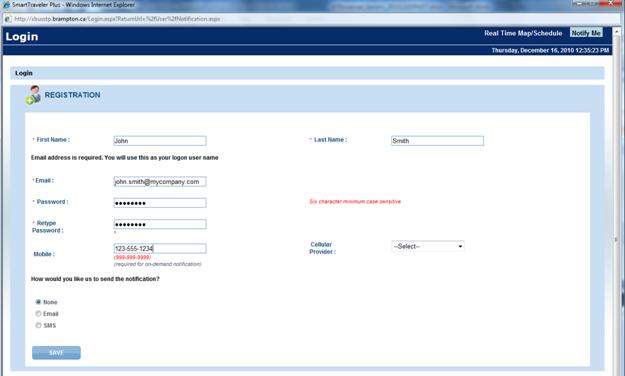
Figure 11
Notify Me Function, “Registration” Page.
- From the Notifications page (see Figure 10), click SETTINGS at the top-right corner. The Settings–Edit Profile page appears (see Figure 12).
- If mobile (SMS text messaging) notifications are desired, enter the mobile phone’s number in the Mobile data entry field, and select the cellular phone service provider’s name from the Cellular Provider pull-down selection list.
- Select the desired notification method from the options listed under “How would you like us to send the notification?”: None, Email, or SMS.
- Click Save to transmit the registration input data. If all of the new profile settings are valid, the message “Records updated successfully” appears near the top of this page.
- Click NOTIFICATION at the top-right corner of the Edit Profile page to return to the Notifications page (see Figure 14).
- From the Notifications page (see Figure 10), click SETTINGS at the top-right corner. The Settings–Edit Profile page appears (see Figure 12).
- Click CHANGE PASSWORD near the top-left corner of this page. The Settings–Change Password page appears (see Figure 13).
- Fill in each of the required data entry fields shown on this page: Current Password, New Password, and Confirm New Password. Note that passwords are required to have at least six characters and are case sensitive.
- If any of the data entries is missing or invalid, a message in red text at the top of the page is displayed (for example: “The password reset failed. Please ensure your current password is correct.”). Correct the data entries as required and click Change Password to resubmit the password change request.
-
Click NOTIFICATION at the top-right corner of the Edit Profile page to return
to the Notifications page (see Figure 10).
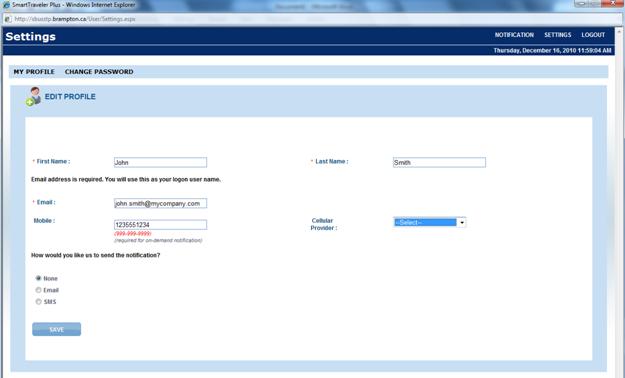
Figure 12
Notify Me Function, “Settings–Edit Profile” Page.
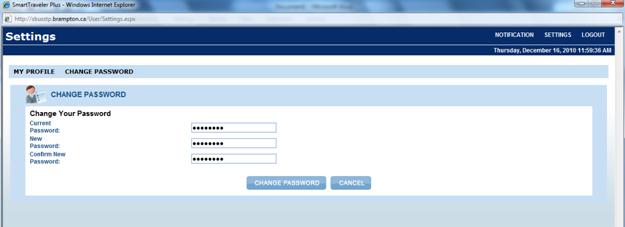
Figure 13
Notify Me Function, “Settings–Change Password” Page.
Click Change Password to submit the password change request. If the data entries are valid, the message “Password reset successfully” appears near the top of this page.
User Login and Logout
Registered Notify Me users must log in to view or modify their current notification subscriptions.
To log in- From the SmartTraveler Plus home page, click the Notify Me button. The Login page appears (see Figure 10).
- Fill in the UserName and Password data entry fields shown on this page. The UserName is the user’s full e-mail address as entered during user registration.
- Click the Submit button to the right of the Password data entry field. If the login data entries are valid, the Notifications page appears (see Figure 14).
- If required login data entries are missing or invalid, the Login page reappears with red text at top: “Your login attempt was not successful. Please try again.” Correct the data entries as required and click Submit to retransmit the login data.
- To receive a password reminder by e-mail, fill in the Email entry field underneath the prompt “Did you forget your password? Enter your e-mail address to have your password sent to you.” Then click the Submit button to the right of this field. If the entered e-mail address is matched to a registered Notify Me user, the user receives an e-mail message with the registered password after a short while. If the e-mail address does not match that of any registered Notify Me user, the Login page reappears with the message “Membership Error.” The user needs to register per the instructions under the User Registration section.
From the Notifications page, click LOGOUT at the top-right corner. The user is logged out and the Login page appears.
Notification Subscription
From the Notifications page (Figure 14), the user may subscribe for personalized service notifications to be received via e-mail or SMS text messages, as defined in the user’s profile during the registration process. Each notification definition identifies a specific combination of stop, service route & direction, day(s) of week, and time of day. The user may set up multiple notification subscriptions, say for both the home-to-work and work-to-home transit trips each weekday. After initial setup, the user may subsequently modify, disable (in other words, temporarily suspend), or permanently delete selected individual subscriptions.
Table 6‑3 summarizes and describes the major elements of the Notifications page.

Notify Me Function, “Notifications” Page Layout.
| Screen Object | Description |
|---|---|
| Select Language control | For multi-lingual implementations, allows user to select a text language. |
| Recent Stops list | Lists up to five recently selected stops, showing stops’ numeric IDs and service routes. User may click on any of the list stops to select that stop and display current vehicle arrival time projections there. |
| Notifications Specification list | Allows user to specify the transit service(s) of interest for which to receive notifications. |
| Navigation controls | Standard Google Maps controls to pan in any direction in the map view or set the zoom level. |
| Current temperature | Displays the current temperature in the transit property’s locale. |
| Current date, time | Displays the current date & time in the transit property’s locale. |
| Find Stop functions |
Tabs to access Stop Selection Functions:
|
| Transit Messages display | Message display used to alert site visitors to current conditions, such as detours and service delays, and other important announcements. |
| Select View controls |
Control to toggle between different map views:
|
Here follow the procedures for managing the user’s personalized service notification subscriptions.
To create new notification subscriptions-
On the Notifications page (see Figure 14), fill in a complete block of data
entry fields shown in the Notifications Specification list, including these fields:
- Stop: A numeric stop identifier;
- Route: A service route & direction that serves the stop;
- Date: Select a single day of the week (e.g., Monday, Thursday) or “Weekday” (to receive notifications for service Mondays thru Fridays), or “Weekend” (to receive notifications for service on Saturdays and Sundays);
- Time: Specify the desired notification time of day by selecting hours & minutes and AM or PM from the two pull-down lists;
- Notify?: To enable notifications immediately, check this checkbox.
- To specify additional subscriptions, fill in additional blocks of data entry fields.
- When finished specifying notification subscriptions, click Save to submit the subscription request. If any of the required data entries for a subscription are missing or invalid, a message pops up to specify the data issue. Correct the data entry as required and click Save to resubmit the request.
- If all of the input data is valid, the message “Notification(s) saved successfully.” appears below the Save button.
- To reload the Notifications Specification list settings last saved by the user, click Reload. The data entry fields are restored to the saved settings and the message “Notification(s) reloaded successfully.” appears below the Reload button.
- Go to the Notifications page to view the currently saved notification subscription settings.
- Edit one or more data entry fields – Stop, Route, Date, and/or Time – for any of the currently saved subscriptions.
- When finished, click Save to submit the data modification request. If any of the required data entries for a subscription are missing or invalid, a message pops up to specify the data issue. Correct the data entry as required and click Save to resubmit the request.
- If all of the input data is valid, the message “Notification(s) saved successfully.” appears below the Save button.
- Go to the Notifications page to view the currently saved notification subscription settings.
- To suspend notification service for any of the currently saved subscriptions, uncheck the “Notify?” checkbox in that block of data entry fields. (This action does not delete the subscription specification itself.)
- To resume notification service for any of the currently saved subscriptions, check the “Notify?” checkbox in that block of data entry fields.
- When finished, click Save to submit the disable/enable subscription request. If all of the input data is valid, the message “Notification(s) saved successfully.” appears below the Save button.
- Go to the Notifications page to view the currently saved notification subscription settings.
- To delete a specific subscription, check the “Delete” checkbox in that block of data entry fields.
- When finished, click Save to submit the delete subscription request. The data entry fields of the deleted subscriptions are restored to their default (empty) settings and the message “Notification(s) saved successfully.” appears below the Save button.
Notification Messages
For each defined and enabled notification subscription, on the subscription’s user-specified day(s) of the week within approximately a minute of the specified notification time, SmartTraveler Plus issues an e-mail or encapsulated SMS message to the user. The message body identifies the notification’s user-specified route and stop number, destination(s), and the next three vehicles’ estimated arrival times.
Figure 15 illustrates a sample e-mail notification. This sample message indicates that, as of the notification time of 8:25 AM, the next three Route 30 vehicles arriving at Stop 831 and destined for Downtown are expected to arrive at 8:35AM, 8:55AM, and 9:10AM.
Sent: Thursday, June 29, 2011 8:25 AM
To: Rider, John Q
Subject: NextRide Notification
Rt 30 at # 831
to Downtown at 8:35AM, 8:55AM, 9:10AM
Sample E-Mail Notification.
NOTES: System-configurable elements of the notification message, such as the subject-line text and arrival time format, are set during SmartTraveler Plus installation. Time format options are 12-hour ([h]h:mmAM/PM) or 24-hour (hh:mm) time.
Route, destination, and estimated time of arrival text should be set to be similar in format to that displayed on LED and LCD information devices to present information consistently to transit customers.
It is also preferable to keep destination text strings short for ease of reading on mobile phones with limited screen sizes and to reduce (SMS) text messaging payload, especially for on-demand notifications that may report multiple destinations (see Chapter 7 section on On-Demand Notification via Text Messaging). Some mobile phone carriers impose a maximum limit on SMS message length (e.g., 130 to 170 characters) while others handle messages as Multimedia Messaging Service (MMS) instead of SMS, perhaps imposing a higher per-message cost on the end-user.
Reliability and timeliness of notification messages is in part subject to the transit agency’s Mail Server and IT network reliability, which is out of the control of the SmartTraveler Plus product deployment. If, for instance, the Mail Server is down, notification messages cannot be issued to users.
SmartTraveler Plus Mobile Operation
The SmartTraveler Plus Mobile application provides PDA and smartphone users access to real-time transit arrival status information, timetables, and service alerts. This chapter documents:
- End-user instructions for the SmartTraveler Plus Mobile product, and
- End-user instructions for obtaining on-demand estimated time of arrival notifications via SMS text messaging (see section On-Demand Notification).
To access the SmartTraveler Plus Mobile home page, launch the Web browser application
and go to this address:
The SmartTraveler Plus Mobile home page appears (see Figure 20).
Home Page
The SmartTraveler Plus Mobile home page (see Figure 20) provides hypertext links to access the application’s major functions, which, depending upon local configuration, may include:
- Real-Time Schedule: Retrieve up-to-the-minute arrival time projections for a selected stop.
- Schedule (Planned Timetable): View timetables of planned arrival times for a selected stop and route & direction.
- Transit Messages: View messages issued by the transit agency regarding current transit service conditions, such as detours and service delays, and other important announcements.
The following sections explain how to use each of these functions.
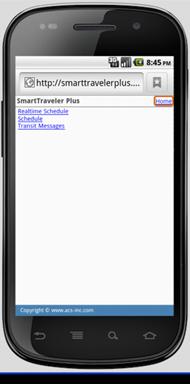
SmartTraveler Plus Mobile Home Page
Real-Time Schedule
From the SmartTraveler Plus Mobile home page (see Figure 20), touch the “Real-Time Schedule” link to access the Real-Time Schedule Selection page (see Figure 21). Use this page to obtain current vehicle arrival time projections for the next upcoming trips at a selected stop.
To obtain arrival time status information for a selected stop, enter the numeric identifier of the stop of interest – for instance, read off of the stop signage – at the “Enter a stop” prompt, then touch “GO” to proceed.
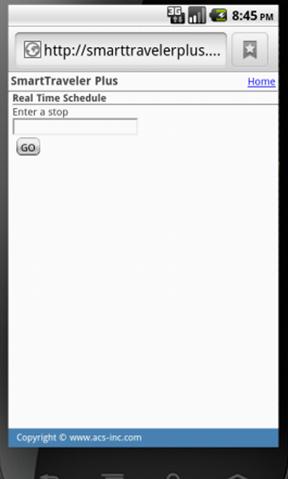
SmartTraveler Plus Mobile “Real-Time Schedule Selection” Page.
If the entered number is a valid stop, the display changes to the Arrival Status page (see Figure 22). The top of this page identifies the currently selected stop by its numeric ID and address. This is followed by a list of the next upcoming vehicle trips servicing this stop. The “Destination” column identifies each trip’s route and destination. The “ETA” column displays projected arrival status in clock time, countdown, or “Due” mode.
To return to the SmartTraveler Plus Mobile home page (see Figure 21), touch the “Home” link.
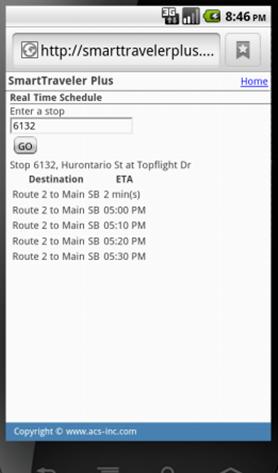
SmartTraveler Plus Mobile “Arrival Status” Page.
Schedule (Planned Timetable)
From the SmartTraveler Plus Mobile home page (see Figure 21), touch the “Schedule” link to access the Planned Schedule Selection page (see Figure 24). Use this page to obtain scheduled vehicle arrival times for a selected stop, service route & direction, date, and time.
To obtain scheduled trip times, enter data at these selection page prompts:
- Enter a stop: Enter the numeric identifier of the stop of interest – for instance, read off of the stop signage – then touch GO to refresh the service route & direction pull-down list.
- Select a route: Select a service route & direction from the pull-down list.
- Select a date: If interested in schedule data for a day other than today, type in a date of interest.
- Start Time: Specify the start time of interest by selecting a clock time and AM or PM from the two pull-down lists.
- End Time: Specify the end time of interest by selecting a clock time and AM or PM from the two pull-down lists.
After completing these entries, touch Get Schedule to proceed.
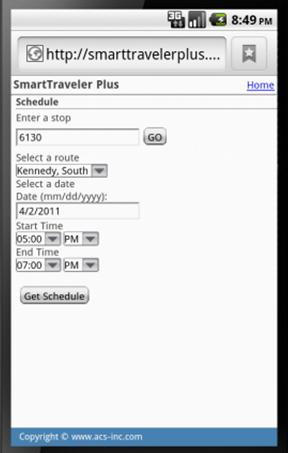
SmartTraveler Plus Mobile “Planned Schedule Selection” Page.
The entered data is valid, the display changes to the Scheduled Times page (see Figure 25). The top of this page identifies the currently selected stop by its numeric ID and address. This is followed by a list of the scheduled trip times at the selected stop for the selected route & direction, date, and time range. The “Destination” column identifies each trip’s route and destination. The “ETA” column displays scheduled arrival time.
To return to the SmartTraveler Plus Mobile home page (see Figure 21), touch the “Home” link.
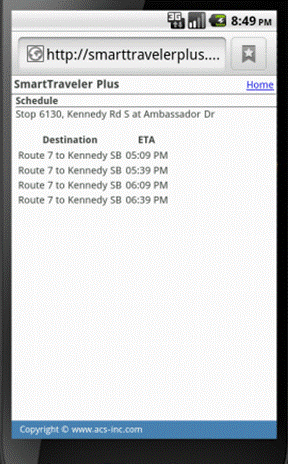
SmartTraveler Plus Mobile “Scheduled Times” Page.
Transit Messages
From the SmartTraveler Plus Mobile home page (see Figure 21), touch the “Transit Messages” link to access the Transit Messages page (see Figure 26). Under the “TRANSIT MESSAGES” heading, this page displays general messages issued by the transit agency regarding current transit service conditions, such as detours and service delays, and other important announcements.
To add to the display messages specific to routes serving a stop of interest, enter the stop’s numeric identifier – for instance, read off of the stop signage – at the “Enter a stop” prompt, then touch “GO” to proceed. If the entered number is a valid stop, the “TRANSIT MESSAGES” display changes to insert alerts specific to that stop.
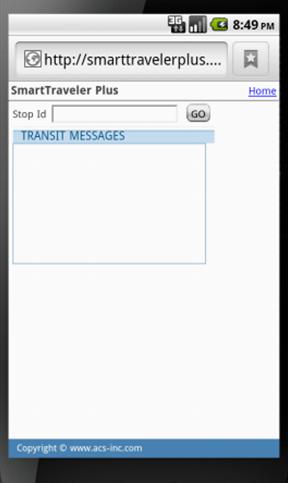
SmartTraveler Plus Mobile “Transit Messages” Page.
On-Demand Notification via Text Messaging
The on-demand notification service responds with a message back to the user reporting transit status as of the time of the request (that is, right now). The message body identifies the stop number, route(s) of service, destination(s), and the next three vehicles’ estimated arrival times.
| Request Option | Example Message | Text Message Response |
|---|---|---|
| Stop Number only | 1023 | Reports expected time of arrival for the next three vehicles, serving any route to any destination at the specified stop. |
| Stop Number and Route separated by a space character | 1023{space}54 | Reports expected time of arrival for the next three vehicles serving the specified route at the specified stop. |
|
Empty text or 0 (zero)
(If the user’s mobile phone carrier does not support sending text messages with an empty body, send 0, which will be treated as empty text.) |
0 | Reports, as separate text messages, expected time of arrival for the next three vehicles for each of the user’s currently defined and enabled notification subscriptions. Stop, route & direction of service are as specified in the notification subscriptions (see Chapter 6 section on Notification Subscription). Each message reports the next three vehicles’ status as of right now, regardless of the subscriptions’ defined days of week and notification times. |
The following figures illustrate sample text message exchanges for each of the request options shown in Table 21.
1023
At # 1023
Rt 54
to Downtown at 4:11PM
to Shopping Mall at 4:21PM
Rt 72
to Village P&R at 4:15PM
1023 54
Rt 54 at # 1023
to Downtown at 4:11PM, 4:31PM
to Shopping Mall at 4:21PM
Figure 29 assumes the user currently has two notification subscriptions defined and enabled, one for Route 52 at Stop 3550, and one for Route 54 at 1023.
0
Rt 52 at # 3550
to Town Hall at 1:15PM, 1:30PM, 1:45PM
Rt 54 at # 1023
to Downtown at 1:11PM, 1:31PM
to Shopping Mall at 1:21PM
For the “empty text” option to result in an on-demand notification response, the user must be registered for the “Notify Me” function (see Chapter 6 section on User Registration) and must have at least one defined (and enabled) notification subscription (see Chapter 6 section on Notification Subscription). Otherwise no message is sent.
If a user sends a request with invalid data, the system will discard the request. (This protects the system against malicious attacks from phones sending garbage requests.)
On-demand notifications cannot be used to request (scheduled) transit information for a future time. To obtain future schedule information, use the SmartTraveler Plus Mobile application’s Schedule (Planned Timetable) option.